How to Build a Wardrobe: A Step-by-Step Guide
If you want the crisp, built-in look with doors that close softly, consistent 2–3 mm reveals, and rock-solid internals, this guide walks you through the full process—from the first measurements to scribed fillers and final QC. You’ll finish with a wardrobe that’s plumb, level, square, and anchored safely.
- Difficulty: Intermediate (comfortable with accurate measuring, cutting, and assembly)
- Time: 1–3 days depending on size, finish, and whether panels are factory-prepped
- Best for: Built-in wardrobes (wall-to-wall or wall-to-gable). Notes for freestanding included.
What you’ll achieve:
- Plumb, level, square carcass modules with full back panels
- Aligned doors/drawers with 2–3 mm reveals and tuned soft-close hardware
- Hanging rails that don’t sag under typical loads
- Tight, scribed fillers and trims with ≤2 mm finished gaps
- A clean, verifiable post-install QC checklist
Before you begin
- Prerequisites: Final opening measurements (width/height/depth) with notes on out-of-plumb/square, a basic layout (module widths, internals), door type (hinged or sliding), and any lighting plan.
- Safety: Eye and ear protection, dust control (especially for MDF), and safe handling of large panels. Coordinate any integrated lighting with a licensed electrician.
Tools
- Track saw or circular saw + straightedge (table saw helps)
- Drill/driver; pocket hole jig or confirmat drill; shelf-pin jig (32 mm is helpful)
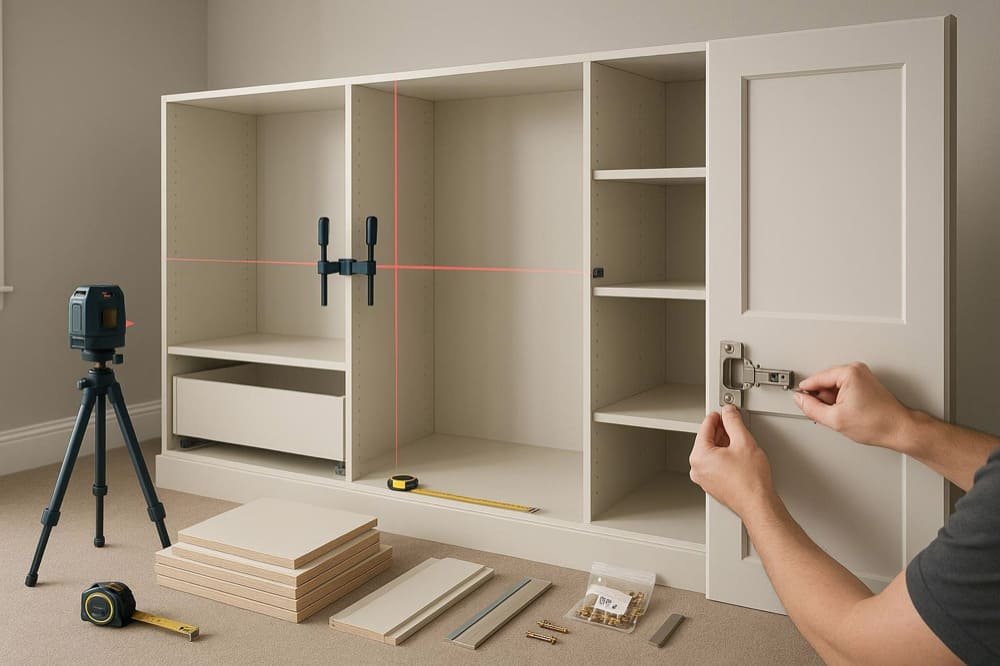
- Router with flush trim/chamfer bits; 35 mm hinge boring bit with depth stop
- Laser level and long spirit level; squares; clamps; shims
- Scribing tools: compass, scribe block, block plane, oscillating multi-tool
- Stud finder; masonry/wood anchors as required; chisels
Materials (typical)
- Carcass: 18 mm sheet goods (plywood, melamine-faced chipboard, or MDF)
- Back panels: 6–9 mm sheet (melamine/ply/MDF)
- Base/toe-kick plinth: 18 mm strips or cabinet feet
- Fillers/trims: 18 mm matching material or paint-grade stock
- Doors: 18–22 mm slab or five-piece; edgebanded as needed
- Hardware: 110° soft-close concealed hinges, full-extension slides, shelf pins, hanging rails and sockets, anti-tip brackets, handles/knobs
- Finishes: Edgebanding, paint/varnish, caulk
Evidence-backed notes:
- 35 mm concealed hinge cups with 3–6 mm boring distance are standard for frameless cabinets; see the hinge manufacturer’s charts such as the Blum concealed hinges technical document (PDF, 2023) and the Blum CLIP top BLUMOTION overview.
- For undermount drawer runners, capacity and drawer box dimensions vary by model; review the Blum MOVENTO tech sheet (up to ~61 kg) or the Blum TANDEM install sheet before you cut.
Step 1 — Site survey and design
- Measure the opening at multiple points.
- Width: at floor, mid-height, and ceiling
- Height: at left and right
- Depth: at both ends
- Note any wall/ceiling bowing and floor out-of-level conditions.
- Decide built-in vs. freestanding.
- Built-in maximizes space and requires a leveling plinth, wall anchoring, and scribed fillers.
- Freestanding is movable, but you should still install anti-tip anchors.
- Select sheet goods.
- 18 mm plywood: lighter than MDF with better screw holding and good in humid climates.
- 18 mm melamine (MFC): cost-effective and consistent; join with confirmat screws/cams.
- 18 mm MDF: great paint finish (especially for shaker doors), heavier and weaker screw holding; seal edges.
- Back panels: 6–9 mm full backs greatly increase racking resistance and help square the carcass.
- Emissions/compliance: In the U.S., composite wood must meet TSCA Title VI limits (e.g., HWPW ≤0.05 ppm formaldehyde). See the EPA TSCA Title VI overview (2018–2019 updates).
- Plan module widths and fillers.
- Common widths: 400, 450, 500, 600 mm to fit hardware and optimize cutting.
- Leave 10–20 mm total side scribe space; 10–30 mm ceiling scribe.
- Consider the 32 mm system for shelf pins and hinge plate positions.
- Produce a cut list and hardware schedule.
- Include panel sizes, edging specs, and drilling patterns (for factory prep).
- If using undermount slides, size the drawer box precisely to your runner system.
Checkpoint: You should now have a measured plan, material choices, module widths, and a complete cut list with hardware quantities.
Step 2 — Build a dead-level plinth (base)
A level base prevents racking and makes everything easier to align.
- Layout and cut the plinth.
- Use 18 mm strips or a ladder frame of stable material. Aim for a footprint 50–80 mm smaller in depth than the carcass to allow a toe-kick.
- Level and anchor.
- Set shims and adjust until level front-to-back and left-to-right—verify with a laser.
- Anchor to the floor (where allowed) and the back wall. Stabilization concepts similar to those used for islands are outlined by Fine Homebuilding; see their write-up on tip-proofing cabinetry on concrete floors (2022).
- Mark reference lines.
- Project a level line on the wall to guide carcass top/bottom positions.
Pro tip: Don’t rely on the base of the carcass to correct floor errors. A well-built plinth is your “foundation.”
Checkpoint: Laser and long level show the plinth is dead level in both axes with solid anchoring.
Step 3 — Fabricate carcass modules
- Cut panels square and to size.
- Use a track saw with rail or a table saw with a reliable fence. Label every part.
- Joinery options.
- Melamine/MFC: Confirmat screws or cam fittings. Use the correct two-step pilot drill for your screw size (e.g., 7×50 mm). Pilot diameters vary by brand—follow the screw manufacturer’s datasheet.
- Plywood: Pocket screws plus glue, or dados/rabbets for increased rigidity.
- MDF: Glue and mechanical fasteners; seal exposed edges.
- Install fixed shelves and full backs.
- Fixed shelves add rigidity; glue and fasten as appropriate to your material.
- Fit a full back (6–9 mm), glued in a rabbet/dado or fastened over perimeter cleats.
- Square the carcass using the back.
- Measure diagonals; a difference ≤2–3 mm is acceptable for most built-ins. Adjust and clamp until square before fastening the back fully.
Why full backs? They dramatically reduce racking and serve as a built-in squaring jig—a common best practice in cabinetry.
Checkpoint: Each module is square (diagonals within 2–3 mm), rigid, and ready to set.
Step 4 — Set, align, and anchor modules
- Place modules on the plinth.
- Start from a corner or a plumblest wall. Shim to plumb in both axes.
- Tie modules together.
- Clamp faces flush. Pre-drill and screw through side panels in concealed zones (behind hinges, slide spacers, or shelf lines).
- Anchor to structure.
- Into studs: Use cabinet screws (#8/#10, 2.5–3 in) through a top/bottom rail or solid area.
- Into masonry: Use appropriate concrete screws or sleeve/wedge anchors.
- Install anti-tip brackets at the top-rear into studs. The U.S. CPSC emphasizes secure anchoring to prevent tip-overs; see their guidance on childproofing and furniture anchoring (2023–2025) and their 2023 safety standard announcement for clothing storage units.
- Re-check for plumb/level.
- Verify face plane alignment and door opening squareness before moving on.
Checkpoint: All modules are tied face-flush, plumb, and securely anchored; openings are square.
Step 5 — Install internals (rails, drawers, shelves)
- Hanging rails.
- For 15×30 mm oval or 25–32 mm round rods, use robust end sockets. Add a center support for spans beyond 900–1000 mm to minimize deflection. Published per-length static ratings are rarely disclosed; as a context reference, pull-down mechanisms list 26–33 lb capacities over ~890–1210 mm spans (see Häfele’s 26 lb model and 33 lb model), but these are not direct proxies for fixed rods. When in doubt, add mid supports.
- Drawer boxes and slides.
- Verify the drawer box width/height/length per your runner’s spec before cutting.
- For undermount systems, follow the manufacturer’s opening-minus rule (e.g., many Blum runners require inside drawer width = opening minus 42 mm). Check the Blum MOVENTO tech sheet or TANDEM install sheet for the exact figures.
- Install cabinet members level and coplanar. Use spacers and a long level to ensure parallelism to within 1 mm across the slide length.
- Adjustable shelves.
- Drill 5 mm shelf-pin holes at 32 mm centers using a jig if possible. Keep pin heights consistent across bays for a unified look.
Checkpoint: Hanging rails are secure with mid supports as needed; drawers slide smoothly and close softly; shelves sit level at consistent heights.
Step 6 — Fit doors and fronts
- Bore hinge cups.
- Use a 35 mm Forstner bit with a depth stop. Typical cup depth for soft-close hinges is around 11.5 mm; confirm in your hinge’s manual.
- Common boring distance (B) from the door edge is 3–6 mm; 3–5 mm is typical for standard overlays on frameless carcasses. See the Blum concealed hinges technical document (PDF) for drilling charts.
- Mount plates and hang doors.
- If you built with the 32 mm system, position plates using those holes. Start with 0 mm plates for standard overlay on frameless, unless your design calls for another height.
- Adjust for consistent reveals.
- Use the hinge cams to dial in side, height, and depth. For many 110° hinges, expect side ±2 mm, height ±2 mm (via plate), and depth around +3/–2 mm; see the Blum hinge systems overview.
- Aim for 2–3 mm gaps uniformly around each door and between pairs.
- On very light doors, consider switching off integrated BLUMOTION on the hinge to prevent bounce-back (refer to the model’s instructions).
- Sliding door note.
- Ensure tracks are straight and level; stiff door panels help avoid racking. Follow your system’s guide for overlap and soft-close catches.
Checkpoint: Doors open and close smoothly, with even 2–3 mm reveals and no rubbing through the full swing.
Step 7 — Scribe fillers and trims
- Cut fillers to rough size and clamp in position.
- Leave enough width to scribe to the wall or ceiling.
- Transfer the wall profile.
- Use a compass or scribe block to trace the wall onto the filler. Back-bevel your cut slightly to ease fitting.
- Cut and test-fit.
- Trim along the scribe line with a track saw or jigsaw and tune with a block plane or oscillating tool. Repeat test fits until gaps are ≤2 mm before caulk/paint.
- Fix and finish.
- Fasten fillers through concealed edges and apply a neat caulk line where paint-grade. Fine Homebuilding outlines reliable techniques for scribing and closing gaps; see their guides on perfect scribing (2022) and tightening built-in wall gaps (2023).
Checkpoint: Fillers meet walls/ceiling cleanly; final paintable gaps are ≤2 mm and visually crisp.
Step 8 — Finishing touches
- Install handles/knobs using a drilling jig for consistent positioning.
- Add door bumpers. If planned, install LED strips into aluminum channels with diffusers; coordinate wiring and power with a licensed electrician.
- Final cleanup and dust removal, especially inside drawers and tracks.
Tools and Materials Stack (with procurement options)
Hardware systems
- Blum CLIP top BLUMOTION hinges and MOVENTO/TANDEM runners are industry standards with detailed technical documentation. See the Blum hinge programme and runner system assembly pages.
Factory-prepped panels and kits
- If you want pre-cut, edgebanded, and pre-drilled panels packaged by room/module, consider ordering from ChinaBestBuy. Disclosure: ChinaBestBuy is our product.
Alternatives (neutral criteria: scope, lead time, customization, pricing)
- Local building suppliers or big-box stores for sheet goods and basic hardware (immediate availability; limited customization).
- Branded hardware distributors (e.g., Häfele) for complete hardware ecosystems and technical support; see Häfele’s drawer slides assortment.
- Local cabinet shops for custom cutting, edge banding, and drilling when you need quick-turn, bespoke parts.
Keep procurement balanced: match your tolerance needs, schedule, and budget.
Troubleshooting — symptoms, causes, fixes
Doors rub or uneven gaps
- Likely causes: Carcass out of square; hinge plate height mismatch; hinge cam misadjusted.
- Fix: Recheck carcass diagonals; adjust hinge cams (side/depth/height); shim plates to align.
Drawer binds or won’t close softly
- Likely causes: Slides not coplanar or parallel; incorrect drawer width for runner spec; carcass racked.
- Fix: Verify slide heights and parallelism with spacers; re-square opening; confirm the drawer box width per runner spec.
Hanging rail sagging
- Likely causes: Span too wide; inadequate sockets; lightweight tube.
- Fix: Add a mid support; upgrade to a stiffer rod; use stronger end sockets.
Plinth feels springy or creaks
- Likely causes: Shims not locked; insufficient anchoring; spans without blocking.
- Fix: Add blocking, re-shim and screw off to floor/wall where permitted; confirm level again.
Hinge cup blow-through
- Likely causes: Cup depth too deep; thin door; no depth stop.
- Fix: Use a depth stop; confirm cup depth per hinge spec (~11.5 mm typical for many soft-close models); test on scrap.
Post-install QC checklist (target tolerances)
Use these practical, field-tested targets unless your project specs state otherwise.
- Plumb/level: Within 1 mm per 1 m; overall deviation ≤3 mm.
- Carcass squareness: Diagonals differ ≤2–3 mm per module/opening.
- Door reveals: 2–3 mm consistently; no rub through full swing.
- Drawer action: Smooth, full extension, soft-close engages; face gaps uniform.
- Hanging rails: Deflection <3 mm under expected load; mid supports installed beyond 900–1000 mm.
- Fixing: Modules tied to studs/masonry; anti-tip installed and secure.
- Finish: Fillers tight; caulk neat; edges sealed; hardware aligned and tight.
Pro move: Keep 2–3 mm plastic spacers or feeler gauges in your pouch to set reveals quickly and verify consistency.
Bill of materials (example specs)
- Sheet goods: 18 mm melamine-faced chipboard (E1/TSCA Title VI compliant) for carcasses; 6–9 mm melamine back. Alternatively 18 mm birch-core plywood for carcass and 18–22 mm MDF for painted doors. See the EPA TSCA Title VI limits and FAQs for U.S. compliance context.
- Hinges: 110° soft-close concealed hinges (35 mm cup). Refer to the Blum concealed hinges technical document (PDF) for cup depth and boring distances.
- Drawer runners: Undermount, full-extension soft-close; size to your cabinet depth. Check the Blum MOVENTO tech sheet or TANDEM install data for load ratings and drawer width formulas.
- Closet rods and sockets: 15×30 mm oval or 25–32 mm round; select steel tubes with robust sockets; plan mid supports for spans >900–1000 mm. Capacity varies by product; consult your supplier if you need engineered values.
- Fasteners: Confirmat screws (e.g., 7×50 mm) for MFC; cabinet screws for wall anchoring; appropriate masonry anchors where needed.
- Anti-tip: Rated anti-tip brackets/straps fixed to studs. See CPSC guidance on anchoring furniture.
- Fillers/trims: Matching 18 mm material or paint-grade; caulk compatible with your finish.
Cut-list template (printable)
Project: Built-in Wardrobe — Cut List

Module ID: ___________   Bay Width: ______ mm   Depth: ______ mm   Height: ______ mm
Material: [MFC | Plywood | MDF]  Thickness: 18 mm   Edge band: [Yes/No, edges: ____]

Panels (mm):
- Left side:     W ______  H ______  Qty 1
- Right side:    W ______  H ______  Qty 1
- Top:           W ______  D ______  Qty 1
- Bottom:        W ______  D ______  Qty 1
- Fixed shelf(s):W ______  D ______  Qty __
- Partition(s):  W ______  H ______  Qty __
- Back panel:    W ______  H ______  t [6/9]  Qty 1

Doors/Fronts (mm):
- Door/Front:    W ______  H ______  t [18–22]  Qty __
- Edge banding notes: ______________________________

Drawers (per box, mm):
- Side (L/R):    L ______  H ______  t ______  Qty 2
- Front/Back:    L ______  H ______  t ______  Qty 2
- Bottom:        W ______  D ______  t [6/9]   Qty 1
- Runner model/length: _____________________________

Hardware Schedule:
- Hinges: ______ pcs (110° soft-close, plate height ___)
- Slides: ______ sets (model __________, length ___)
- Shelf pins: ______ pcs (5 mm)
- Hanging rail: Length(s) ______; Sockets: ______ pcs; Mid supports: ______ pcs
- Anti-tip brackets: ______ pcs
- Screws/anchors: __________________________________

Notes:
- 32 mm hole pattern? [Yes/No]  Drilling pattern attached? [Yes/No]
- Finish/edge band spec: ____________________________
Pro tips that save time and headaches
- Standardize module widths (400/450/600 mm) and door sizes to simplify ordering and drilling patterns.
- Use parametric spreadsheets or CAD to auto-generate cut lists and edging counts.
- Order panels pre-edgebanded and pre-drilled (32 mm) to reduce site labor and limit error stacking.
- Keep a reveal gauge (2–3 mm spacers) handy to set doors and drawer fronts quickly.
- Follow a consistent install sequence: plinth → corner bay → adjacent bays → internals → doors → fillers.
Next steps
If you’re managing multiple rooms or need factory-prepped consistency, you can source pre-cut, edgebanded, and labeled panel kits with matching hardware through ChinaBestBuy or comparable suppliers; provide shop drawings with drilling patterns and finish codes for smooth QC. Balance that option against local-shop or self-fabrication to match your schedule and budget.
Pro Tip: Take your time on the plinth and squaring checks—those two steps make everything else go faster.