Guide to Standard Door Dimensions for Your Home (2025)
If you’re choosing or replacing doors, the two things that cause most headaches are mismeasurement and underestimating clearances. This guide shows standard interior/exterior sizes, how to decide widths by room and accessibility, and how to measure correctly for slabs, prehung units, and rough openings—plus quick metric equivalents and pro checklists. Plan 15–25 minutes to measure a few openings carefully.
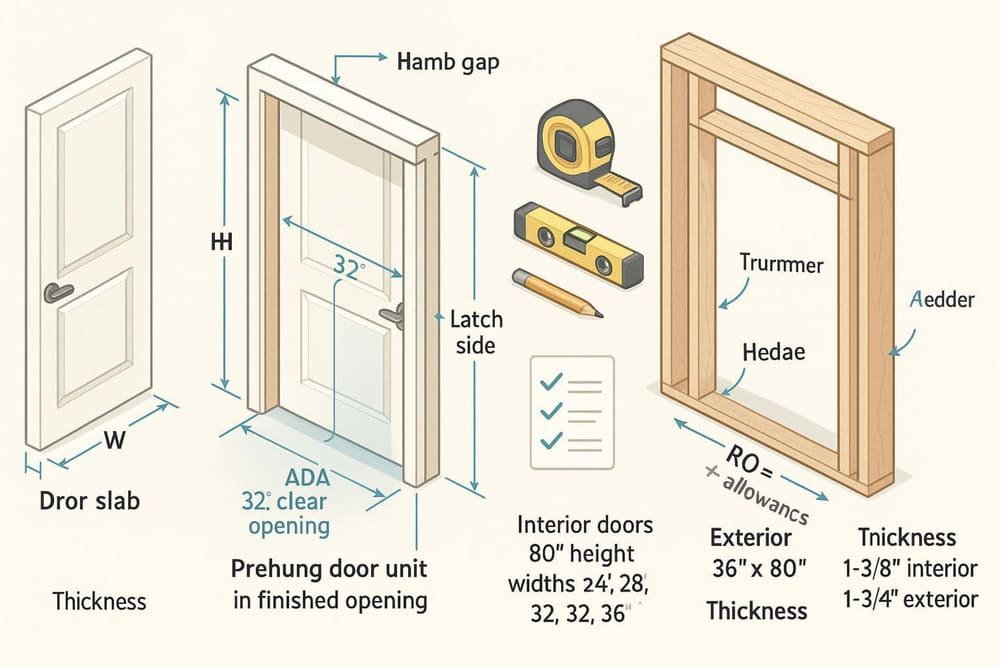
Code note (read this first): Requirements vary by jurisdiction. Many U.S. projects target a 32-inch minimum clear opening for egress/accessible doors, measured with the door at 90°. See the publicly viewable 2018 IRC context in ICC Digital Codes — 2018 IRC R311 egress view and the DOJ’s minimum in ADA 2010 Standards — 404.2.3 Clear Width. Always verify your local code edition and any amendments.
1) What “standard” really means in 2025
“Standard” sizes are common starting points; manufacturers vary. Always confirm the spec sheet for the exact unit you plan to buy.
Interior doors
- Typical height: 80″ (6’8″). Taller: 84″ and 96″ are common in newer homes. See manufacturer guidance: Masonite — How to measure for interior doors.
- Common widths: 24″, 28″, 30″, 32″, 36″. Typical thickness: 1-3/8″ (some premium/acoustic at 1-3/4″). Overview: Masonite — Inside look at interior doors.
Exterior entry doors
- Typical primary entry: 36″ × 80″; wider/taller (30–42″ width; 84–96″ height) increasingly common. Sizing overview: Pella — Standard sizing guide for entry doors.
- Typical thickness: 1-3/4″ for entry doors (per manufacturer norms): Pella — Standard sizing guide for entry doors.
Rough opening (RO) rule of thumb (interior)
- Many interior prehungs fit ROs ≈ door width + ~2″ and height + ~2 to 2-1/2″. Some manufacturer pages show RO heights around 82-1/2″ for an 80″ door: Masonite — Exterior measuring page with RO context. But always check your product’s installation PDF.
Key takeaway: Use these as targets, then verify the product’s installation PDF before framing or ordering.
2) Decide your door width by room and accessibility
Clear opening is measured with the door at 90° between the door face and the stop. The ADA’s 2010 standard calls for 32″ minimum clear width at a point; many homes use a 36″ swinging door to achieve ~32″ clear after jambs/hardware: ADA 2010 — 404.2.3 Clear Width. For egress, consult your local IRC edition; see the public 2018 view: ICC 2018 IRC R311 egress view.
Use this practical guide:
Bathrooms and laundry
- Typical: 28–32″. If accessibility or moving appliances matters, target 32–36″ nominal so you approach or meet 32″ clear after hardware.
Bedrooms and living areas
- Typical: 30–32″. For main pathways and future-proofing, 36″ often makes furniture moves and accessibility easier.
Closets and pantries
- Typical: 24–28″. Where swing conflicts exist, consider bifolds or sliders (see special door types below).
Main entry/egress
- A 36″ × 80″ door is a common baseline in the U.S.; confirm the net clear width after jambs/hardware with your local code and product sheet.
Pro tip: On high‑traffic routes, choose 36″. It’s the most reliable way to hit ~32″ clear once frame and hardware are installed, aligning with ADA/A117.1 measurement methods.
If your space needs a 36″ clear path or a custom height, ChinaBestBuy can size, prehang, and match jamb depths to your rough opening while coordinating finishes across your project. They also handle QA and global shipping for multi-door packages.
3) Measure correctly: slab vs. prehung vs. rough opening
Confusing slab size, prehung size, and rough opening is the number-one cause of returns. Measure for the product you intend to buy.
Tools: Tape measure, 24–48″ level or laser, framing square, notepad/phone, pencil, and optionally calipers for jambs.
A) Replacing a slab only (reuse your existing frame)
Measure the existing slab itself:
- Width × height: exact slab dimensions.
- Thickness: interior commonly 1-3/8″; exterior 1-3/4″.
- Hinge details: count hinges; note leaf size (often 3.5″ on interiors), corner radius, and centerlines from the top of the slab. Typical field spacing is ~7″ down to the top hinge and ~11″ up from the bottom for the bottom hinge, with middle(s) spaced evenly—always record your actuals. Guidance: Schlage — Door hinge buying guide.
- Lock prep: bore diameter (commonly 2-1/8″) and backset (2-3/8″ or 2-3/4″). Reference: Baldwin Hardware — FAQs on bore size and backset.
Verify swing and handing:
- Stand on the side the door swings toward; hinges on your right = right-hand; on your left = left-hand.
Pitfalls to avoid:
- Ordering a slab that doesn’t match hinge spacing/backset.
- Forgetting latch-edge bevel; specify if needed.
B) Replacing with a prehung unit (new frame)
Measure the finished opening and wall thickness:
- Width and height between inside faces of existing jambs/casing (if replacing unit-in-frame). If demoing to studs, see the RO section.
- Jamb depth: measure wall thickness (finished to finished). Common depths: 4-9/16″ for 2×4 walls, 6-9/16″ for 2×6 walls; see manufacturer ADM options.
Check plumb, level, and square:
- Use a long level on both sides; measure diagonals—equal diagonals indicate square.
Account for flooring and thresholds:
- If flooring will change, include its thickness so the threshold and undercut clear properly. Install guides emphasize measuring relative to threshold/finished floor: Pella — Bi‑Fold/Hinged door install guide.
C) Framing or reframing a rough opening (RO)
- Choose the door unit first, then use its RO chart.
- Field rule for many interior prehungs: RO width ≈ door width + ~2″; RO height ≈ door height + ~2 to 2‑1/2″. Example: a 30″ × 80″ door often wants ~32″ × 82–82-1/2″ RO. Example context: Masonite — Exterior measuring page.
- Exterior entries can vary; some systems specify RO no more than about +1/2–3/4″ in width and +1/2″ in height over unit size: installation guidance example from Pella shows tight tolerances—always check your product’s PDF.
4) Rough opening math that avoids trim/drywall conflicts
Follow this workflow to avoid “too tight to shim” or “casing hits the corner” problems:
1. Start with the exact unit spec.
- Grab the manufacturer’s installation PDF/ADM. If it gives a specific RO, use that. If it gives a clearance allowance (e.g., ≤ +3/4″), translate it to your framed opening.
2. Add allowances intentionally.
- Interior prehung without threshold: Allow for shims (~1/4″ each side) and a small head gap for leveling. The common +2″ W and +2–2-1/2″ H rule works in many cases (confirm on the product sheet).
- Exterior with threshold/sill pan: Account for sill pan thickness and finished floor height. Install booklets show alignment to thresholds and finished floors: Pella — New‑construction entry door booklet.
3. Check adjacent trim and corners.
- Dry‑fit casing against nearby corners/outlets. If casing will crash into a corner, consider a narrower unit or narrower casing.
4. Verify squareness and plumb early.
- Before ordering, confirm the framing isn’t bowed or twisted. Correct now; doors telegraph framing errors.
5) Jamb depth: match your wall thickness
If the jamb depth doesn’t match the wall, casing reveals will be uneven and you’ll need extensions. Standard jamb depths include 4-9/16″ (2×4 studs with 1/2″ drywall both sides) and 6-9/16″ (2×6 wall). Manufacturer documents list these options. Ordering the correct depth up front saves time.
6) Special door types (pocket, barn, sliding, double)
Pocket doors
- Common panel widths: 24–36″; heights to 80–96″ depending on system. A popular kit specifies RO width = 2 × door width + 1″ and RO height = door height + 4-1/2″: Johnson Hardware — 1500 Series LI1500.
- Framing tips: Keep the pocket cavity clear of plumbing/electrical; ensure a dead‑level header; heavy/tall doors may need 2×6 walls or heavy‑duty kits: Johnson — 2060SC heavy‑duty pocket frame.
Barn (surface‑sliding) doors
- Provide solid blocking or hit studs for the track; spacers stand the track off the wall to clear baseboard: Häfele — Baseboard spacer for barn door hardware.
- For privacy/light control, oversize the door beyond the opening—many installers overlap by ~2–3″ per side. Barn doors don’t seal like swing doors; privacy hardware exists: Häfele — privacy lock example.
Sliding/bypass closet doors
- Typical panels 24–36″; track kits cover standard to long spans: Johnson — 111SM bypass hardware and Johnson — 200SM side‑mount sliding.
Double/French doors
- Common pairs combine two leaves (e.g., 2 × 30″ = 60″ nominal). If only one leaf is active most of the time, ensure that leaf alone provides the clear width you need (often aiming for 34–36″ active leaf for accessibility goals).
7) Taller doors (84″/96″): hardware and framing considerations
Taller doors add weight and leverage. Plan hinges and framing accordingly:
- Hinge count: A typical rule is two hinges up to 60″ height, add one hinge for each additional 30″. Most 80–84″ doors use three hinges; 96″ doors commonly use four; ball‑bearing hinges are recommended for heavy/tall/exterior doors. Catalog guidance: Hager — Commercial hinges catalog (2024).
- Framing: Use straight, dry studs; dead‑level header; verify floor level across the swing arc to avoid rubbing.
- Lead time: 8′ interior doors and matching frames can have longer lead times—order early and confirm RO from the manufacturer doc.
8) Quick metric equivalents (for international projects)
Here are common modules and approximate inch equivalents. Always verify locally.
- Australia (internal modules): 2040 mm height; widths 520, 620, 720, 770, 820, 870, 920, 1020 mm: Doors Plus — Standard internal door sizes in Australia.
- United Kingdom (internal examples): 1981 × 686 mm (2’3″), 1981 × 762 mm (2’6″), 1981 × 838 mm (2’9″): JELD‑WEN UK — Secureset structural & clear opening sizes.
ChinaBestBuy can supply custom imperial or metric sizes and advise on regional norms.
9) Verification checklist (about 5 minutes per opening)
- Measure width and height in three places; record the smallest.
- Check plumb with a long level on both sides.
- Measure diagonals; the closer they match, the squarer the opening.
- Confirm door thickness (interior 1-3/8″ typical; exterior 1-3/4″).
- Confirm jamb depth vs wall thickness (e.g., 4-9/16″ for 2×4 + 1/2″ drywall both sides; 6-9/16″ for 2×6 walls).
- If targeting accessibility, mock the net clear opening: confirm you’ll meet ~32″ clear at 90° per ADA’s measurement method.
- For exterior units, note finished-floor height and threshold type; include underlayment and flooring thickness.
10) Troubleshooting: quick fixes to common problems
- RO too small: Reframe trimmers/header to the required RO, or order a smaller/custom unit. Don’t press a prehung into a tight hole—no shim room leads to binding.
- RO too large: Add trimmers or plywood shims symmetrically; maintain room for proper shimming on hinge and latch sides.
- Jamb depth mismatch: Use extension jambs as a patch, but the best fix is ordering the correct jamb depth.
- Floor/threshold conflict on exteriors: Reassess sill pan + threshold stack and flooring build-up; many install guides instruct measuring to the top of threshold/finished floor.
- Slab won’t fit old frame: Re-check hinge locations, corner radius, backset, and slab thickness. Hardware makers document standard bore/backset.
- Door binds or won’t latch: Re‑shim hinge side to achieve consistent reveals; add a long screw through the top hinge into the stud to pull the jamb if needed.
11) Ordering smart + free sizing check
If you need a single replacement or a full-house package—including interior swing doors, exterior entries, pocket/barn systems, frames, and hardware—consider a one‑stop supplier that can tailor to your measurements.
ChinaBestBuy offers custom sizing (imperial/metric), prehanging to your rough openings, matching frames/jamb depths/casings, coordinated hardware, QA inspections, multi‑language support, and global shipping.
Before you order anywhere, share your measurements for a no‑pressure review. ChinaBestBuy will sanity‑check your slab vs prehung vs RO numbers, recommend the correct jamb depth, and prehang to your RO if desired.
Get a free sizing check and custom quote: ChinaBestBuy — One‑stop doors and project solutions
Final reminders
- Verify local code and accessibility requirements with your building department (IRC edition and any amendments), and confirm rough opening and installation details in the manufacturer’s current PDF for your exact model.
- On main pathways, a 36″ door helps you achieve a ~32″ clear opening after hardware, aligning with ADA/ICC measurement methods.
You’ve got this—measure once the right way, and you’ll only have to install once.