Living Room Remodeling Solutions – How To Design Your Living Room
Design your living room like a pro—from first measurement to installation—using a build-ready workflow you can hand directly to contractors or vendors. This guide turns “inspiration” into a practical plan with checklists, diagrams, and finish schedules, so you avoid costly rework and mismatched materials.
- Difficulty: Moderate (you can DIY the planning; hire trades for electrical and installation)
- Time to complete planning package: 1–2 weekends (depending on room complexity)
- What you’ll produce: a verified measurement set, a scaled 1:20 layout, a basic lighting circuit plan, and a unified finish schedule
- Safety/code note: Electrical layouts and outlet specs must match your local code; consult a licensed electrician for circuit design and installation.
Step 1: Measure and Zone (non‑negotiable)
Before choosing a sofa or a paint color, lock down your room’s exact dimensions and how you’ll use each area.
Do this
- Measure precisely (target ±3 mm on critical spans):
- Room length/width/height, and net ceiling height (below beams/ducts)
- Structural elements: columns, beams, bulkheads
- Doors/windows: sizes, sill heights, positions, and swing directions
- Existing outlets, switches, and any HVAC grilles/radiators
- Sketch a scaled outline:
- Use graph paper or an app; label each wall and opening
- Add door swing arcs (hinge point to door width radius)
- Map use-case zones (write them on the plan):
- TV/media wall, seating/sofa, conversation/reading corner, storage, circulation paths
- Photo-log each wall with a tape reference; name files to match your sketch labels.
Pro tip
- I always do a second pass “re-measure” day after day; you’ll catch the 3–5 mm deltas that cause custom millwork headaches.
Quick verification
- Every opening and wall length measured twice and matches within ±3 mm
- Door swings drawn and labeled; no furniture planned inside the arcs
- Zones are clear on the plan and support a simple traffic loop from entry to balcony/window to seating
Contractor script
- “Please re-verify all critical dimensions (wall A, B, C; door/window openings) to ±3 mm before we lock shop drawings or place any custom orders.”
Troubleshooting
- Found different numbers each time? Keep the larger number for fit, annotate “field verify,” and require a re-measure before fabrication.
- Not sure where to put storage? Stack storage along the least interrupted wall and keep at least one long wall clean for the main focal point.
Downloadables
- Measurement checklist template (Excel/Sheet) and a printable 1:20 grid worksheet: until our dedicated download page is live, you can request the toolkit on the homepage: https://chinabestbuying.com
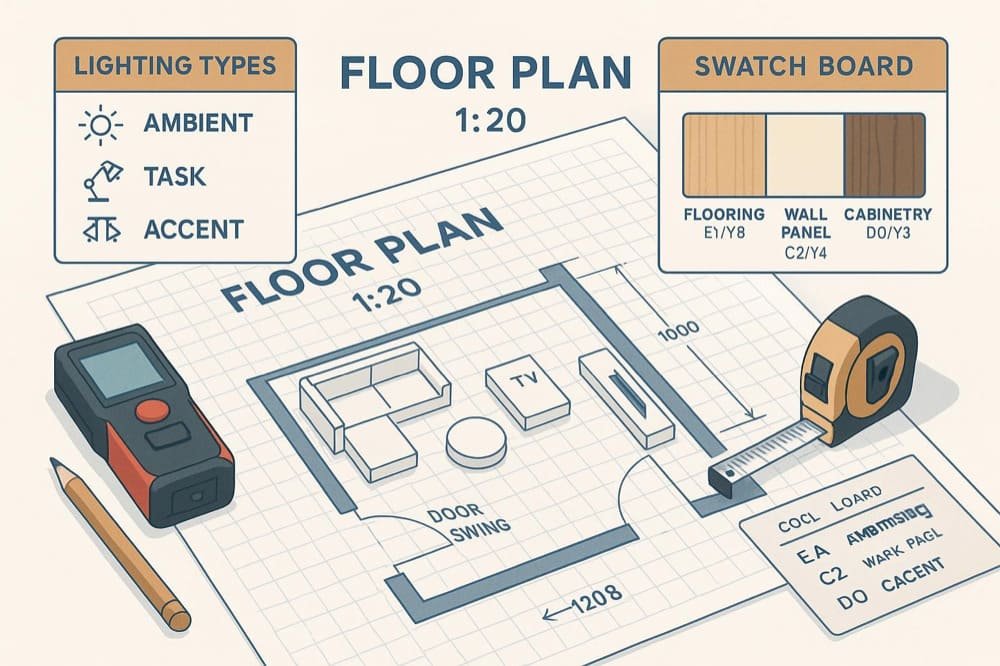
Step 2: Plan Layout and Traffic Flow (1:20 scale)
With measurements in hand, arrange furniture on a scaled plan and check movement paths.
Do this
- Choose your focal point(s): TV/fireplace, a view, or a feature wall. Arrange seating to face or frame it.
- Draw furniture to scale (1:20 metric or 1/4″ = 1′-0″ imperial). Use cutouts to test options.
- Simulate door/window swings with arcs; ensure no collisions.
- Check clearances and spacing:
- Main walkways: aim for 30–36 in; high-traffic zones up to 36–48 in feel comfortable, as echoed by multiple layout guides in 2023–2025.
- Sofa to coffee table: roughly 14–18 in is a common comfort range cited by design practitioners in 2025.
- Side table reach: keep within about 18–24 in from the seat edge for easy access.
Evidence references in practice
- Designers often target 30–36 in for comfortable circulation, and 18 in around the coffee table, per the 2025 update on living room layout rules by Emily Henderson: living room rules update (Style by Emily Henderson, 2025).
- Retail and design guides reiterate wider walkways for heavy traffic and practical reach distances, e.g., furniture measuring and movement spacing (Gardner‑White, 2025) and arranging living rooms with 36 in main paths (Alton Refrigeration, 2023).
Quick verification
- Walk every pathway you’ve drawn; nothing dips below ~30 in in main routes
- Sit-test: place tape on the floor for sofa and table; confirm 14–18 in legroom feels right
- Door arcs clear furniture by a comfortable margin; windows can open fully
Contractor script
- “Please lay out furniture and door swing arcs on a 1:20 plan and confirm main paths are ≥30 in before we finalize outlet locations and lighting.”
Troubleshooting
- Tight room? Scale down coffee table depth or switch to nested tables.
- Multiple focal points (e.g., TV and fireplace)? Angle the seating to bisect or make one the daily focal and the other a secondary accent; you can also define two mini‑zones.
Downloadables
- 1:20 furniture layout worksheet: request via our homepage while the download page is being finalized.
Step 3: Plan Lighting and Electrical (layered + circuit map)
Create a flexible, layered lighting plan and group fixtures by circuits so you’re not stuck with a single, harsh overhead light.
Do this
- Layer your light:
- Ambient: general illumination (ceiling cans, central fixture, or wall lights)
- Task: focused light for reading, desk, or hobbies (floor/table lamps, adjustable sconces)
- Accent: highlights and mood (picture lights, spotlights, LED strips)
- Group by circuit/controls:
- Place ambient, task, and accent on separate switches; add dimmers or smart scenes
- Provide 3‑way switching at entries in larger rooms
- Map outlets and low‑voltage runs:
- Switched outlets or smart plugs for lamps at seating
- Power/data at TV wall; consider conduit paths for future upgrades
- Choose color temperature bands:
- 2700–3000K warm white for living areas; keep layers in a tight CCT band for cohesion
Evidence references
- The ambient/task/accent framework is a foundational best practice explained by GE Lighting’s ambient vs. task vs. accent overview (2023) and reinforced by layered lighting how‑tos (SuperBrightLEDs, 2024). Scene-based control ideas are summarized in Redfin’s 2025 layered lighting guide.
Quick verification
- Each activity zone has at least one dedicated task or accent source in addition to ambient
- You can switch and dim each layer independently
- TV wall has enough outlets and low‑voltage points; cords will be hidden
Safety/code note
- Align outlet spacing, load calculations, and fixture installation with local electrical code. Always consult a licensed electrician before altering circuits.
Contractor script
- “Please separate ambient, task, and accent lighting on distinct dimmable circuits. Provide a simple circuit map labeling each switch and its controlled fixtures.”
Downloadables
- Sample circuit map and labeling legend: request through our homepage while the gated download goes live.
Step 4: Unify Your Finish Schedule (color/material cohesion)
A single, unified finish schedule prevents color drift and hardware clashes when different vendors supply flooring, panels, cabinetry, doors, and baseboards.
Do this
- Select 2–3 core tones for the room (e.g., floor, wall panel, primary furniture) and build everything around them.
- Create a swatch board: take photos of the actual samples together and record codes.
- Build a finish schedule with fields like: Room/Location, Element (floor/wall panel/cabinet/door/baseboard), Manufacturer, Product & Color Code, Material, Size, Sheen/Gloss level, Hardware finish, Quantity, Installation notes, Approval date.
- Approve physical samples; keep a control set for comparisons.
- Share the same schedule and photos with every supplier.
Evidence references
- Finish schedules and their fields are explained in professional resources such as the NKBA’s 2023 “Finish Plan & Finish Schedules” chapter and overviews like Archisoup’s finish schedule guide (2023).
Advanced tip (optional)
- For painted and powder-coated items, some manufacturers control color variance to about ΔE ≤ 1.0 under standard measurement; confirm tolerances and lighting conditions up front and record in your schedule. See coating tolerance explainers like OKDOR on paint/powder ΔE bands (2024).
Quick verification
- All visible finishes have codes in one document
- Hardware finishes (e.g., satin brass, matte black) are consistent across cabinets and doors
- You can place any two items side-by-side and they read as a coordinated set
Contractor script
- “We will fabricate only after a single, signed finish schedule is issued and the control samples are approved. Please reference the exact codes and sheen levels on all submittals.”
Downloadables
- Finish schedule template (Excel): request via our homepage while the gated download goes live.
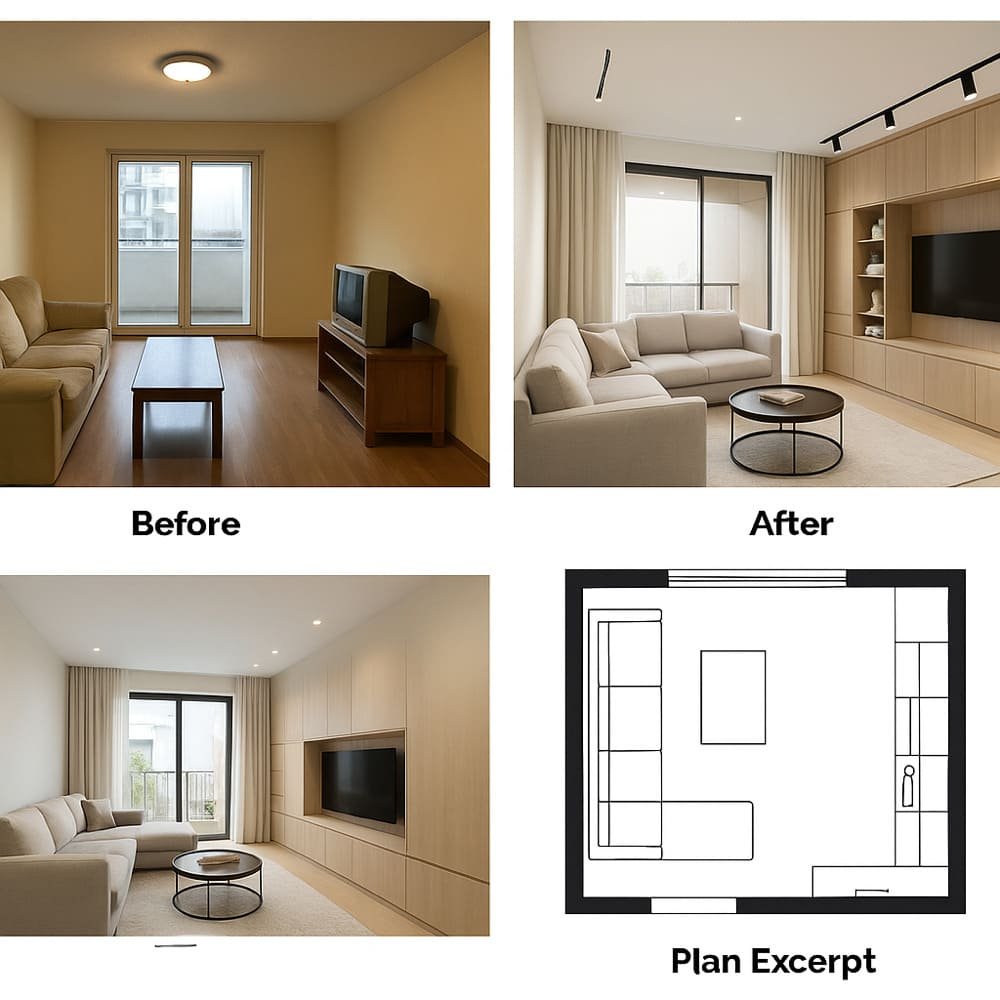
Practical Example: How a Unified Finish Schedule Prevents Mismatches
Imagine your living room package includes engineered oak flooring, walnut wall panels, custom media cabinetry, a matching door set, and baseboards. Without a single finish schedule, each vendor might interpret “natural oak” or “walnut” differently—and deliver varying tones and sheens. By issuing one schedule with swatch photos and codes, you lock the palette and reduce rework.
First‑mention integration
- You can execute this with any consolidated supplier workflow. For instance, ChinaBestBuy supports unified schedules by collecting swatches, aligning factory finishes, and conducting cross‑item QC to reduce color and hardware mismatches across vendors.
How to replicate the idea with any vendor set
- Send the same swatch photos and codes to all factories
- Ask each vendor to confirm finish codes on their shop drawings
- Approve control samples before releasing POs; require photos of actual production against your controls
Step 5: Factory Drawings and QC (shop drawings + re‑measure)
Treat your living room like a mini‑project: get shop drawings, review them, and re‑measure before fabrication.
Do this
- Require detailed shop drawings for custom items (cabinetry, panels, built‑ins): dimensions, materials, edge details, hardware, and tolerances.
- Redline and approve drawings; archive the “Approved for Fabrication” set.
- Enforce a field verification step for critical site dimensions before issuing POs.
- Ensure finish codes and hardware specs from your schedule appear on every drawing.
Evidence references
- The shop drawing submittal/approval workflow is standard in construction; see a procedural summary in zippBoard’s shop drawing review guide (2024). Millwork best practices emphasize field verification before fabrication, e.g., Mcline Studios’ review tips (2023).
Quick verification
- Every custom item has an approved drawing; finish codes are referenced
- A “field verify” note is checked off with updated measurements
- Tolerances are written (e.g., ±1/16 in on panel widths, specific to product and grade)
Contractor script
- “Release for fabrication only after shop drawings are approved and after a site re‑measure confirms critical spans. Include finish codes and hardware finishes on each drawing sheet.”
Step 6: Ordering, Logistics, and Installation Prep
Order in a coordinated way and prepare the site so materials arrive, acclimate, and install smoothly.
Do this
- Consolidate orders to align lead times and reduce mismatch risk; schedule deliveries when the site is weather‑tight and ‘wet work’ is complete.
- On delivery, inspect packaging and contents; photo‑document any damage.
- For wood products (flooring, panels): verify moisture content and acclimate per manufacturer guidance; log temperature and relative humidity.
- Stage products by room/sequence; protect traffic paths; maintain a running punch list during installation.
Evidence references
- Wood flooring bodies emphasize conditioning and environment control prior to installation; see the National Wood Flooring Association’s magazine articles on acclimation and environmental conditions in 2023, such as Rethink Acclimation (Hardwood Floors Magazine, 2023) and Environmental conditions before/during/after install (Hardwood Floors Magazine, 2023).
Quick verification
- Site is closed-in, dry, and HVAC running to target conditions before delivery
- Moisture meter readings logged; MC difference within product tolerance
- Punch list items captured and closed before sign‑off
Contractor script
- “Deliver only after permanent HVAC is on and wet work is dry. Acclimate wood products per manufacturer instructions and record MC and RH daily until installation.”
Troubleshooting and FAQs
Q: My main walkway is under 30 in. What’s the least I can live with?
A: Many designers still aim for 30–36 in in main routes; 24–30 in can function in tighter spots. Consider smaller furniture or a different arrangement. See practical ranges referenced in the 2025 update by Emily Henderson and movement spacing guides like Gardner‑White.
Q: How far should I sit from a 65″ 4K TV?
A: Start around 1.5–2.5× the screen diagonal for mixed use, which is about 5.4–8.1 ft for 65″. These ranges align with cinema field‑of‑view guidance summarized from THX/SMPTE; see the concise explainer by How‑To Geek on TV viewing distance (2023).
Q: Do I really need a unified finish schedule?
A: If more than one vendor is involved, yes. It’s the simplest way to avoid color mismatches and hardware conflicts. Professional curricula like the NKBA’s finish plan chapter (2023) outline the structure.
Q: What if I’m not hiring a designer?
A: Do the minimum viable trio yourself: a verified measurement set, a scaled 1:20 plan with door arcs and clearances, and a single finish schedule with approved samples. Require shop drawings for any custom items and a field re‑measure before fabrication.
Next Steps
- Download the toolkit (measurement checklist + finish schedule template + sample circuit map): request it now on our homepage: https://chinabestbuying.com
- Submit your completed measurements to request a coordinated materials package quote for your living room.
- Prefer to talk it through? Book a free consultation to get coordinated selection and sampling aligned to your budget and timeline.
Friendly reminder: Electrical work must meet your local code—engage a licensed electrician for any circuit changes, and always verify product installation requirements with the manufacturer.