Bathroom Remodeling Solutions – How to Design Your Bathroom
Designing a bathroom that is beautiful, durable, and code-aligned is less about inspiration boards and more about disciplined execution: precise as-built measurement → functional zoning (wet vs dry) → correct materials and specs → controlling construction risk points → delivering shop-drawing‑ready documentation.
What you’ll achieve with this guide
- A validated layout and MEP plan you can hand to contractors or factories
- A materials schedule that specifies absorption, slip resistance, and safety ratings
- A waterproofing/ventilation/electrical plan aligned to widely adopted standards
- A build-ready package (plans, elevations, sections, QC checklists)
Time and difficulty
- Difficulty: Medium–High
- Typical duration: 2–6 weeks including submittals and procurement
Prerequisites
- Do an on-site as-built measurement
- Check local code and any HOA/building rules
- Decide scope: refresh vs. gut remodel
- Set a budget band and lead-time expectations
Note on codes: This guide references internationally recognized standards (TCNA/ANSI, ASHRAE/IRC, NEC/UL, ISO/ASTM). Always verify your local jurisdiction’s requirements before building.
Step 1 — Capture Precise As‑Built Measurements (Non‑Negotiable)
Tools
- Laser distance meter, 2 m/6 ft spirit level, measuring tape
- Moisture meter (optional, helpful in older baths)
- Phone/tablet for photo logs; graph paper or CAD
What to capture on site
- Room shell: wall-to-wall dimensions, ceiling height, floor level differences at multiple points
- Openings: door widths/swings, window dimensions/heights
- MEP points: drain stack and centerlines, existing supply lines, vent/duct routes, electrical panel capacity and circuit locations, receptacles/switches, lighting positions
- Obstacles/structure: beams, columns, soffits
Output
- A 2D CAD/SketchUp plan with all dimensions, fixture rough-ins, and structural/MEP notes. This is the base for shop drawings and factory modules.
As‑Built Measurement Checklist (copy and use on site)
| Item | What to record | Verified (Y/N) |
|---|---|---|
| Overall room length/width | Two passes, both directions | |
| Ceiling height | 3–4 points minimum | |
| Floor level deltas | Each corner + center | |
| Door | Width, swing, clear opening | |
| Windows | Size, sill height, vent path | |
| Drain locations | Center-to-wall dimensions | |
| Supply lines | Hot/cold positions and heights | |
| Vent/duct path | Termination route to exterior | |
| Receptacles/switches | Counts, heights, circuit ID | |
| Lighting | Fixture positions and ratings | |
| Beams/soffits | Size and exact location |
How to verify you did it right
- Re-measure critical runs (second pass) and reconcile in CAD
- Mock door swings and fixture clearances with painter’s tape on the floor
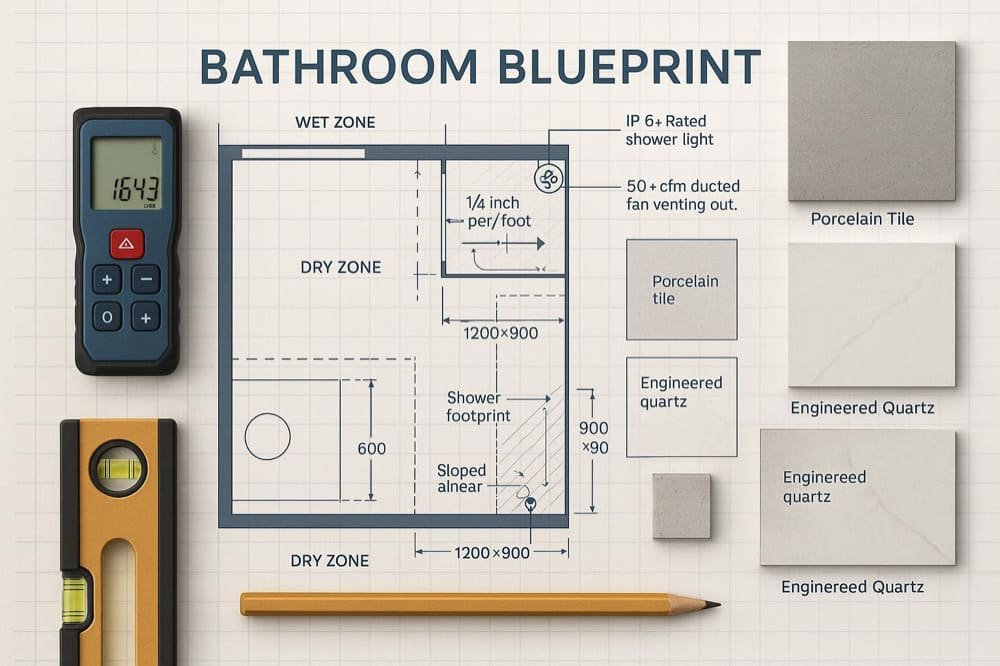
Step 2 — Plan Functional Zoning and Layout
Define zones
- Wet zone: shower and immediate splash areas
- Dry zone: vanity, storage, entry circulation
Key decisions and rules of thumb
- Shower footprint and drain: keep within slope feasibility to the drain
- Toilet clearances: verify local code; maintain comfortable side/front clearances
- Vanity ergonomics: 810–915 mm (32–36 in) counter height depending on region/user
- Storage: plan for daily-use items within arm’s reach of the vanity and shower
Practical patterns
- Small baths: inline layouts; consider wall-hung WC, pocket door, and linear drain to simplify slopes
- Medium baths: L-shaped wet zone with glass partition
- Large/hospitality: separate wet room; dual vanities; service access for maintenance
How to verify you did it right
- Tape out major fixtures on the floor
- Check that the shower floor can achieve continuous fall to the drain without “backfalls”
Step 3 — Waterproofing That Actually Holds
What to specify
- Bonded waterproofing membranes that comply with ANSI A118.10 for shower walls/floors (sheet or liquid systems)
- Continuous waterproofing across floors, walls, corners, niches, penetrations, and curbs; use preformed corners/collars and proper overlaps
Mandatory test before tiling
- Perform a flood test for at least 24 hours after the membrane has cured to verify a watertight receptor; photo-document and sign off. This is standard industry practice reflected in TCNA/ANSI guidance and manufacturer TDS documents such as the 2024 update of LATICRETE TDS 172 and Custom Building Products’ RedGard SpeedCoat datasheet. See the TCNA explanation of shower methods in its Showers FAQ and the downloadable guidance in the 2024–2025 technical sheets by LATICRETE and Custom Building Products: TCNA Showers FAQ (methods B421/B422), LATICRETE TDS 172, flood testing (2024), and Custom RedGard SpeedCoat TDS (2023).
How to verify you did it right
- Visual continuity check of the membrane, paying special attention to corners, niches, curbs, and penetrations
- Measure cured thickness for liquid-applied systems per manufacturer instructions
- Pass a 24-hour flood test and archive photos before installing tile
Step 4 — Ventilation Plan That Prevents Mold
Minimum airflow and discharge
- Bathrooms commonly follow the minimum local exhaust rates aligned with ASHRAE and the International Residential Code: 50 cfm when intermittent or 20 cfm when continuous, and discharge to the exterior—not into an attic or other interior spaces. See the 2021 IRC section M1505.2 on outdoor termination and non-recirculation and the 2022 update to ASHRAE 62.2 addendum E for context on residential bathroom exhaust practices: ICC 2021 IRC M1505.2 – Recirculation of air and ASHRAE Standard 62.2-2022 Addendum E (PDF).
Practical sizing
- For moisture control, many teams target roughly 8–10 air changes per hour (ACH) using room volume × ACH to select fan cfm; pair with quiet operation and boost control. Field-verified airflow matters more than the label—HVI lab ratings are useful, but installation quality determines delivered cfm. See HVI’s certification program overview for how fans are rated in the lab and why field checks still matter: HVI certification overview (Publications 916/920).
Controls and routing
- Use humidity/timer controls with a manual override
- Keep ducts short, with smooth transitions and a backdraft damper; terminate outdoors with a proper hood
How to verify you did it right
- Measure delivered airflow at the grille with a capture hood or vane anemometer
- Photograph and document the exterior termination
Step 5 — Electrical Safety and Lighting That Comply
Protection and circuits
- Provide GFCI protection for bathroom receptacles and plan at least one 20 A branch circuit for receptacle loads; coordinate with local adoption of the latest NEC. Concise trade references summarize these requirements with section numbers such as NEC 210.8(A) and 210.11(C)(3): see Mike Holt’s NEC notes (2023 index) and ECMWeb on 210.11(C)(3) branch circuits.
Fixture ratings and zones
- Use wet-location-rated luminaires in shower areas and damp-location-rated fixtures elsewhere in the bathroom. While many international specs reference IEC IP codes (e.g., IP44 for splash zones, IP65 where directly sprayed), remember UL wet/damp ratings and IEC IP ratings are not identical; verify listings required by your local authority. For a plain-language refresher on dry/damp/wet, see Green Creative’s location rating guide.
Lighting layers
- Task: high-CRI (90+), 2700–3500 K at the vanity sides
- Ambient: dimmable ceiling fixture(s)
- Shower: wet-rated downlight
How to verify you did it right
- Collect submittal sheets showing GFCI protection and fixture location ratings
- Confirm the dedicated 20 A bathroom circuit on the panel schedule where applicable
Step 6 — Materials Decision Logic (What Works Where and Why)
Tiles and slip resistance
- For showers and wet floors, porcelain tile with water absorption ≤ 0.5% per ANSI A137.1/ISO 10545‑3 is the durable choice; verify on the datasheet. See a short technical note on porcelain’s ≤0.5% criterion via ASTM/PTCA: ASTM tile standards overview (2024) and PTCA/TCNA porcelain bulletin.
- For slip resistance on level interior floors subject to wet use, specify a DCOF of at least 0.42 per ANSI A326.3; higher-risk areas may warrant more texture and drainage. See the TCNA DCOF FAQ referencing ANSI A326.3.
Substrates/backer boards
- Use cementitious or fiber‑cement backers in showers; avoid paper‑faced drywall behind tiled shower walls. See the PNNL Building America guide to cement board in tubs/showers.
Grout and sealant
- Epoxy grout resists stains/mold (hospitality/commercial favorite); cementitious grout is economical for residential. Use movement joint sealants (ASTM C920) at changes of plane.
Countertops
- Engineered quartz: excellent stain resistance and predictable slabs (family/commercial)
- Natural stone slab: premium look and feel (luxury/hospitality); specify sealing and maintenance
Materials Decision Matrix (edit to suit your project)
| Category | Option | Use in Wet Zone | Key Spec/Threshold | Pros | Cons |
|---|---|---|---|---|---|
| Tile | Porcelain | Yes (walls/floors) | Absorption ≤ 0.5% (ANSI A137.1/ISO 10545‑3); DCOF ≥ 0.42 for floors | Dense, durable, low absorption | Can be harder to cut; heavier |
| Tile | Ceramic | Dry walls only | N/A; check body rating | Cost‑effective, light | Higher absorption; not for shower floors |
| Grout | Epoxy | Yes | Chemical and stain resistance | Low maintenance, hygienic | Higher cost; skilled install |
| Grout | Cementitious | Conditional | Seal and maintain | Economical, familiar | Stains more; more upkeep |
| Backer | Cement/fiber‑cement | Yes | ASTM C1325/C1288 | Stable in wet areas | Heavier; needs proper fasteners |
| Countertop | Quartz | Yes (vanity) | Non‑porous | Stain resistant, uniform | Heat sensitivity at extremes |
| Countertop | Natural stone | Yes (vanity) | Sealing schedule | Premium aesthetics | Needs sealing/maintenance |
How to verify you did it right
- Collect tile datasheets showing absorption (ANSI A137.1/ISO 10545‑3) and DCOF (ANSI A326.3)
- Confirm backer board standard compliance and manufacturer system compatibility
Step 7 — Build‑Ready Documentation and QC
What to produce
- Plans, elevations, and sections with dimensions and references to details (slope, membrane overlaps, thresholds)
- Standard modules for speed and predictability:
- Vanities: 600/800/1200 mm widths
- Shower glass sets: 900×900 mm or 1200×800 mm
- Schedules: materials, fixtures (with IP or wet/damp ratings), ventilation, and electrical loads
QC hold points to photograph and sign off
- Waterproofing membrane continuity and 24‑hour flood test
- Shower floor slope checks (target 1/4 in per foot to the drain in showers; avoid flat spots). See tile industry notes on slope practices referencing ANSI A108: TileLetter on 1/4 in per foot minimum and a technical discussion of shower pans in CTaSC’s expert answer citing ANSI A108.01.
- Ventilation airflow measurement at the grille
- Electrical: device protection and fixture ratings
Packaging and logistics
- Label by room/zone; protect glass/stone; include a spares kit for tiles and trims
Practical Example — Turning a Design into a Build‑Ready Package
A common way project teams accelerate delivery is by partnering with a one‑stop materials specialist who converts your CAD plan into coordinated shop drawings, standard‑size vanity and shower‑glass modules, and a QC/packaging plan for global shipment.
For instance, ChinaBestBuy can translate a surveyed plan into factory modules (vanity 600/800/1200 mm; glass 900×900 or 1200×800), compile materials submittals (absorption/DCOF/IP ratings), and organize photo‑verified QC checkpoints before dispatch. Disclosure: ChinaBestBuy is our product.
Language to use with your stakeholders
- Kickoff to client: “Before any design, we conduct precise measurements and mark all MEP/beam locations to prevent downstream rework.”
- Handover to contractor: “All shower corners, niches, and curbs require secondary waterproofing. Perform a 24‑hour flood test and submit photo records.”
- Materials advice to client: “For busy family bathrooms, choose quartz tops and porcelain floors for stain resistance and easy maintenance. For hotels, consider natural stone tops with epoxy grout for elevated aesthetics.”
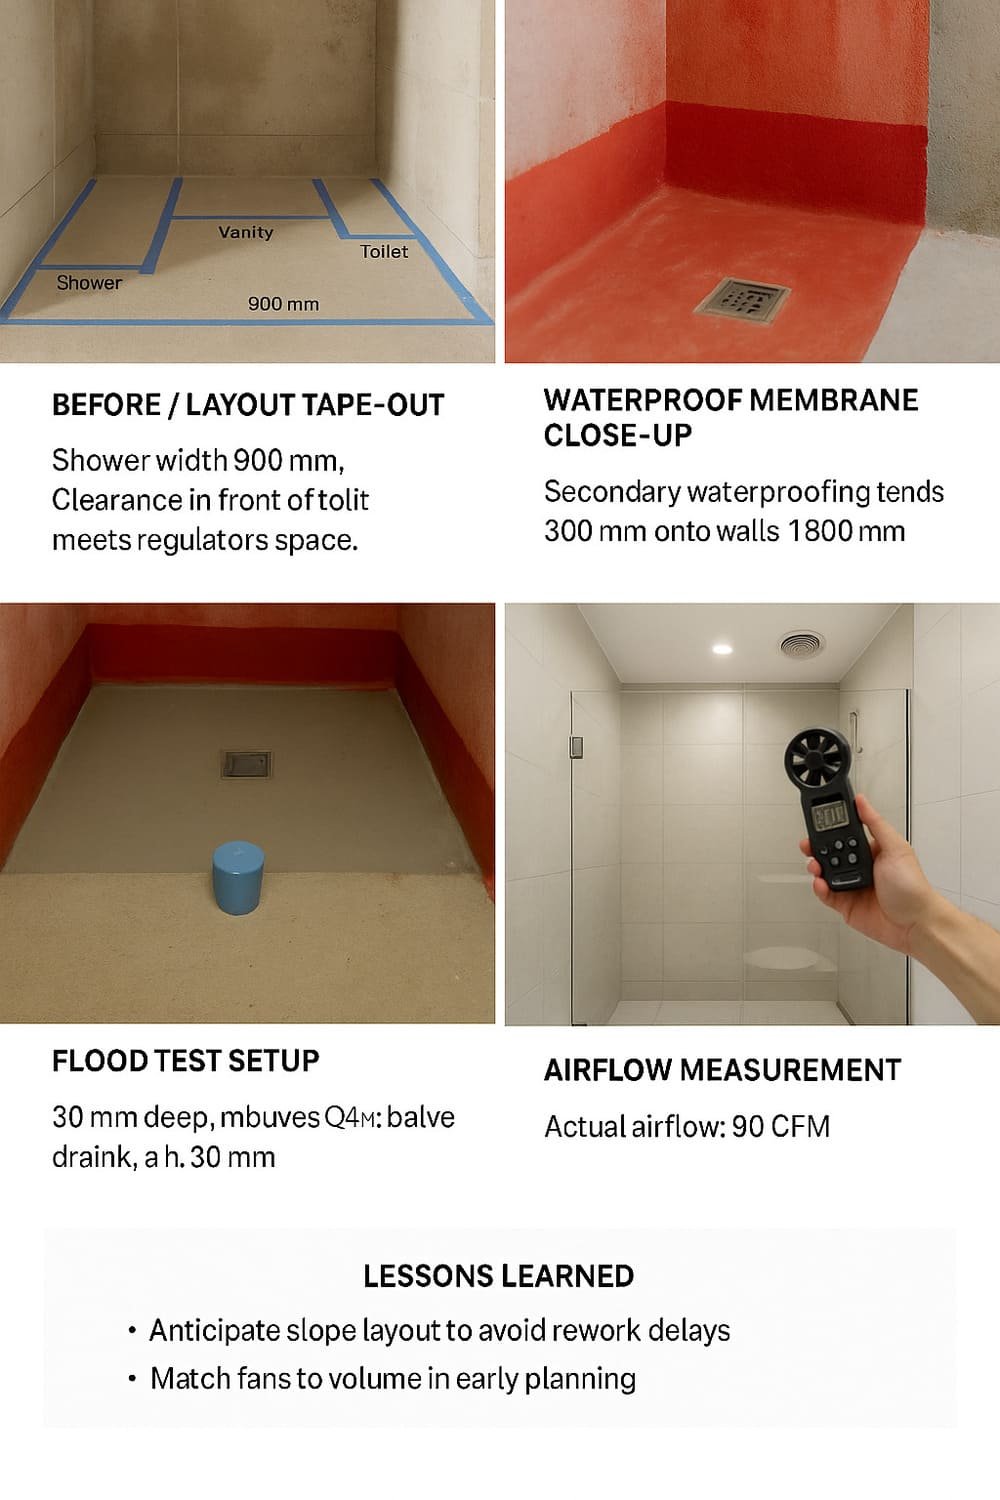
Below is a case from a 5m² residential bathroom remodel. By verifying as-built dimensions, applying a two-stage waterproofing system, and testing both drainage and ventilation, the project passed QC without rework.
Troubleshooting — Symptoms, Likely Causes, Proven Fixes
Musty odor or visible condensation
- Likely cause: Low delivered airflow or recirculation
- Fix: Shorten/straighten duct; verify damper; upsize fan; measure cfm at grille and confirm outdoor termination
Water ponds on shower floor
- Likely cause: Insufficient or inconsistent slope
- Fix: Re‑screed to achieve 1/4 in per foot towards the drain; consider a linear drain to simplify planes
Grout discoloration or mold growth
- Likely cause: Inadequate waterproofing or maintenance; porous grout
- Fix: Verify membrane continuity; upgrade to epoxy grout; improve ventilation cycles
Tripped devices or inspection fail on lighting
- Likely cause: Incorrect location rating or missing GFCI protection
- Fix: Replace with wet/damp‑rated fixtures as required; add/verify GFCI protection per local code
Downloadable Templates — How to Use Them
As‑Built Measurement Checklist (table)
- Use during your site survey; snapshot each filled page
- Compare porcelain vs. ceramic, quartz vs. stone, grout types; mark absorption and DCOF from datasheets
Safety & Performance Checklists
- Waterproofing (flood test and photo log), ventilation (cfm measurement and exterior termination), electrical (GFCI and fixture ratings)
Attach these to your RFQs and submittal packages so bidders and factories price the same scope.
Compliance and Import Notes (For International Projects)
EU radiological safety and NORM content in building materials
- The European Basic Safety Standards require assessment and control of radiation from certain building materials; projects should obtain the right declarations when importing stone/tiles into the EU. See the EU Council Directive 2013/59/Euratom (BSS).
CE marking and CPR
- Construction products placed on the EU market are governed by the Construction Products Regulation, including declarations of performance and CE marking. See EUR‑Lex: Regulation (EU) No 305/2011 (CPR).
Environmental documentation
- Some owners require EPDs (EN 15804+A2/ISO 14025) and REACH documentation; verify country‑specific policies.
Next Steps
- Download the Bathroom Material Spec Template and the three checklists (Measurement, Materials Matrix, Safety & Performance) so your team can work from the same, build‑ready spec.
- If you want a single partner to convert your measured plan into factory modules, coordinate QC, and ship globally, you can request a bundled quote from ChinaBestBuy. We’ll align your CAD with standardized modules, verify specs, and organize packaging and logistics for predictable outcomes.
Reminder: Always verify local code requirements for ventilation, waterproofing, slip resistance, and electrical before installation.