Rough Opening for a 36-Inch Door: Installation Guide
If you’re setting an exterior 36×80 prehung door, this guide walks you through selecting the correct rough opening (RO), framing it accurately, and installing the unit with pro-grade moisture management and verification checks. It’s written for site carpenters, foremen/GCs, and advanced DIYers working in North American framing.
- Difficulty: Intermediate (carpentry + flashing fundamentals)
- Time: 2–4 hours for a pro; 1 day for DIY including flashing and finish checks
- Applies to: Exterior prehung 36×80 single doors with threshold/sill; brief notes for interior and masonry openings
Quick answer: typical RO for a 36×80 exterior prehung door
- Most projects land on roughly 38-1/2 in (W) × 82-1/4 in (H) for a 36×80 prehung, which aligns with trade/manufacturer-style guidance and retail listings (e.g., a common 36×80 prehung frame O.D. is about 37-1/2 × 81-1/2, leaving ~1/2 in total side shim and ~3/4 in head clearance) as reflected in the Therma-Tru Benchmark 36×80 listing at Lowe’s (actual 37.5 × 81.5) and the Home Depot measuring guide for doors (2024).
- The practical band most installers use is 38″–38-1/2″ wide and 82″–82-1/2″ high, adjusted by your actual frame size, shim needs, sill pan type, and finished-floor build-up, consistent with ranges summarized in DoorDesignLab’s rough opening guide.
Important: Always verify the final RO against the specific door unit’s submittal (outside-of-jamb dimensions) and your moisture/detail stack.
How to choose 38″, 38-1/4″, or 38-1/2″ (and 82″, 82-1/4″, or 82-1/2″)
- Start from your unit’s outside-of-jamb (O.D.) frame size (e.g., ~37-1/2″ × ~81-1/2″). Many listings publish this; see the Lowe’s example above with 37.5″ × 81.5″ O.D.
- Add adjustment allowances:
- Side shim space: about 1/4″ per side (≈1/2″ total) for plumb/square adjustment and foam/backer rod. This is standard practice echoed in retail/manufacturer instructions like the Lowe’s install PDF stating RO > unit size to allow shimming (2023).
- Head clearance: 1/4″–3/4″ depending on sill pan type (formed vs liquid-applied), membrane layers, and finished-floor build-up.
- Choose toward the larger end (e.g., 38-1/2″ × 82-1/4″ to 82-1/2″) when:
- You’ll use a formed sill pan or layered membranes adding height.
- You plan backer rod and low-expansion foam.
- Field conditions aren’t perfectly true and you want adjustment room.
- Choose toward the tighter end (e.g., 38″ × 82″) when:
- The frame O.D. is on the larger side and the opening is very true.
- You’re minimizing trim gaps and not stacking multiple sill membranes.
- For interior prehung doors (no threshold/pan), 36×80 commonly frames at ~38″ × ~82″—but still confirm the unit O.D. Note that jamb depth affects wall finish alignment, not RO width/height, as clarified in Masonite’s measuring guide.
Tools and materials (non-negotiables)
- Weatherproofing and sealants
- Sill pan (formed metal/plastic) or liquid-applied pan system
- Flexible self-adhered flashing tape and compatible sealant
- WRB integration materials
- Shimming and insulation
- Composite shims; 1/8″ reveal spacers; closed-cell backer rod
- Low-expansion/low-pressure window & door foam (apply in lifts)
- Fastening
- Corrosion-resistant structural screws; long hinge screws (#8–#10, 2-1/2″–3″)
- For masonry: appropriate masonry anchors; e.g., Pella shows 3/16″ masonry fasteners in their entry-door instructions (see Pella installation booklet)
- Layout and verification
- Tape measure; 6′ level or laser; framing square; plumb bob
- Temporary spreaders; story stick; oscillating tool; drill/driver; utility knife; pry bar; hammer
Pro tip: Pre-shim the hinge side at hinge positions before lifting the unit. This comes directly from manufacturer-style guidance like Therma-Tru’s installation knowledge base (2024).
Before you start: measure, plan, and check codes
- Measure your door unit’s O.D. frame size. Do not rely on nominal 36×80 alone. The Lowe’s example cited shows 37.5″ × 81.5″ actual frame O.D. for a 36×80 prehung.
- Plan the sill stack: formed pan or liquid-applied, membrane layers, and finished-floor build-up (tile/wood). More layers → more head clearance.
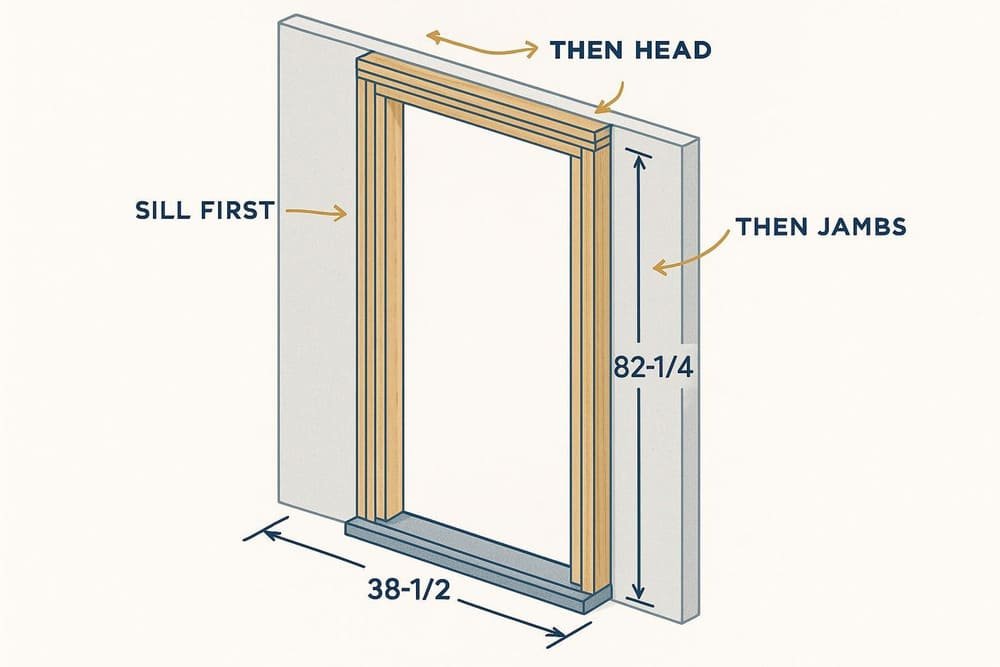
- Moisture sequencing: Follow “sill → jambs → head” and integrate with the WRB in shingle fashion per ASTM E2112-23 standard practice and the U.S. DOE Building America Solution Center.
- ADA/egress: New ADA thresholds are limited to 1/2″ max height (with bevel rules), and many occupancies require ≥32″ clear width; verify your code set. See U.S. Access Board §404.2.5 thresholds (2024) and ICC IBC 2024 portal for egress widths.
Safety: Wear eye/hand protection, watch sharp metal flashing edges, and verify any electrical/plumbing near the opening before cutting.
Step-by-step installation
1) Verify unit details and site constraints
- Confirm handing/swing, hardware prep, and threshold type. Check the frame O.D. dimension on the submittal.
- Confirm clear opening needs (e.g., ADA 32″ minimum clear) and swing clearance with adjacent walls.
Checkpoints
- Door slab matches plan (handing/swing). Frame O.D. measured. Code constraints identified.
Pitfalls
- Assuming 38″ × 82″ works for all 36×80 units. Always validate against your door’s O.D.
2) Calculate the rough opening
- RO width = frame O.D. width + ~1/2″ total for shims.
- RO height = frame O.D. height + 1/4″–3/4″ for sill pan/floor build-up and adjustment.
Why it matters
- These allowances give you control to plumb, square, and insulate without bowing the jambs. Retail/manufacturer references recommend RO larger than the unit to allow shimming, such as the Lowe’s instruction (2023).
3) Frame the opening
- Install king and jack studs; set a level header. Target your chosen RO (e.g., 38-1/2″ × 82-1/4″).
- Keep studs straight; plane or shim as needed. Confirm sill is level.
Checkpoints
- Stud-to-stud width and subfloor-to-header height within ±1/8″ of target.
- Sill level and straight; hinge-side stud plumb.
4) Prep the opening: sill pan and flashing
- Dry-fit the sill pan. Ensure slope to exterior and a back dam or sealant dam per detail.
- Apply self-adhered flashing at the sill, lapping up jambs 2–6″. Then flash jambs, then head, all shingle fashion, integrated with WRB per ASTM E2112-23 and the DOE Building America guidance.
Pitfalls
- Trapping water by sealing weeps or reversing laps. Keep drainage to the exterior.
5) Dry-fit, pre-shim, and set the unit
- Pre-shim the hinge side at hinge locations (about 10″ from top, at middle hinge, and above bottom hinge). Close and temporarily secure the door slab if possible.
- Set the unit on the pan; center it; use a 6′ level or laser to make the hinge jamb dead plumb.
- Tack fasten at the hinge-side shims.
Pro tip
- Many manufacturers emphasize hinge-side plumb and straight; see Therma-Tru’s install knowledge base (2024).
6) Set reveals and fasten per spec
- Aim for a uniform ~1/8″ reveal between slab and jamb. Pella explicitly targets ~1/8″ in its entry door instructions; see Pella’s block-frame booklet.
- Replace two hinge screws per hinge with longer structural screws into framing (#8–#10, 2-1/2″–3″). This is a common best practice echoed in trade sources like Fine Homebuilding’s prehung door tips (2022).
- Fasten through factory holes or as specified, keeping fasteners at shim points to avoid pulling the jamb out of plane.
- Install head flashing last, lapping over jamb flashing.
- Seal the exterior perimeter joint per manufacturer guidance; don’t seal the sill in a way that traps water.
7) Insulate and air-seal
- Place backer rod in the perimeter gap where sealant will go.
- Apply low-expansion/low-pressure foam in small lifts around the jambs. Avoid overfilling to prevent jamb bowing. Manufacturers caution against high-pressure foams; see Pella installation guidance (2023).
- After cure, trim excess foam and install sealant over backer rod.
Troubleshooting
- If the jamb bows after foaming, cut back the cured foam, reset shims/reveals, and re-foam carefully, consistent with Pella’s cautions in V984527 (2022).
8) Final verification and adjustments
- Check diagonals of the frame; equal diagonals indicate square.
- Confirm even weatherstrip compression, latch/strike engagement, and that the sweep contacts the threshold without excessive drag.
- Confirm threshold elevation meets ADA where applicable; new thresholds generally must not exceed 1/2″ height per U.S. Access Board §404.2.5 (2024).
Interior door notes (brief)
- Interior prehung units typically have no threshold or sill pan. For a 36×80 interior prehung, ~38″ × ~82″ is common, but always verify the frame O.D. before framing. Moisture management is not the same as exterior, but plumb/square and reveal targets still apply.
2×4 vs 2×6 walls: what changes and what doesn’t
- Jamb depth (e.g., 4-9/16″ for 2×4; 6-9/16″ for 2×6) affects alignment with interior/exterior finishes and casing returns, but it does not change RO width/height. This separation of RO from jamb depth is explained in Masonite’s measuring guide.
Masonry/CMU openings (brief)
- Use appropriate masonry anchors through the jamb at shim points. As a reference, Pella’s entry-door instructions call for 3/16″ masonry screws and pre-drilling in concrete/CMU settings; see Pella’s masonry anchor guidance.
- Integrate the sill pan and flashing with adjacent masonry and WRB. Maintain shingle fashion laps and drainage to the exterior.
Troubleshooting: if X, then Y
- RO too tight: Don’t force the unit. Plane high spots, remove interfering drywall or sheathing edges, or widen the RO to target tolerances.
- Threshold too high/low: Reassess the sill pan stack and flooring plan; you may need additional head clearance or to change pan type. Verify ADA threshold limits per U.S. Access Board (2024).
- Hinge-side out of plumb: Back out fasteners, re-shim at hinge locations, confirm with a 6′ level, then refasten. This priority is highlighted in Therma-Tru installation guidance.
- Bowed jamb after foam: Cut out excess foam after cure, reset shims/reveals, re-foam with low-pressure foam in small lifts as advised by Pella (2023).
- Water at sill: Confirm correct pan slope, do not block weeps, and verify flashing order (sill → jambs → head) per ASTM E2112-23 and DOE Building America.
Key takeaways
- Start with the actual frame O.D.—not the nominal size.
- Typical RO targets for a 36×80 exterior prehung are 38–38-1/2 in (W) and 82–82-1/2 in (H); a widely used default is 38-1/2″ × 82-1/4″.
- Pick your head clearance based on sill pan type and finished-floor build-up.
- Flash shingle-fashion: sill → jambs → head.
- Make the hinge side plumb and straight before you chase the reveals.
- Use backer rod + low-expansion foam; avoid bowing the jambs.
Next steps
If you’d like door packages delivered to site with frames, hardware, and weatherproofing kits ready to go—and consolidated logistics—consider requesting a bundled spec and quote from ChinaBestBuy.
We can coordinate prehung units, QC/photo reports, packaging, and global shipping to reduce install errors and simplify your procurement.