How to Install a Bathroom Pocket Door Like a Pro: 2026 Contractor’s Guide
Pocket doors are a centerpiece of modern bathroom design—space-saving, sleek, and the ultimate solution for high-end residential and commercial projects. But unlike swinging doors, pocket installations are unforgiving: missteps in framing, hardware, or moisture protection can lead to costly callbacks, finish damage, or code violations.
This guide delivers trade-level, step-by-step expertise for project leaders, contractors, and designers. You’ll achieve:
- Perfectly smooth, silent door glide
- Seamless trim integration with zero hardware exposure
- Full moisture, ADA, and fire-code compliance
- Error-proof workflow for scale installs and custom projects
- Integrated sourcing with ChinaBestBuy’s factory-direct pocket door systems
Project Complexity: Moderate–High (for experienced pros)
Prerequisites:
- Solid understanding of framing and finishing
- Access to standard and specialty tools (laser level, multi-tool, nailer, ChinaBestBuy door kit)
- Site ready for construction — pre-demolition, utilities cleared, moisture plan in place
Note: For high-volume installs or custom designs, ChinaBestBuy’s consulting team (learn more) can assist with code, specification, and global logistics.
Step 1: Site Preparation and Prerequisite Checks
Before the first stud is cut, a meticulous site check saves hours—and prevents the most common pocket door failures. Here’s how:
1.1. Wall Thickness & Clearance
- Wall cavity must be at least twice the door thickness: Standard 1-3/4″ doors need a minimum 3-1/2″ pocket depth.
- Check for obstructions—electrical, plumbing, HVAC—using wall scanners or inspection panels.
1.2. Load-Bearing Status & Structure
- Is the wall load-bearing? If so, design a reinforced header (double 2×10 or engineered beam per code). Consult structural engineering for large spans (reference).
- ChinaBestBuy Tip: Their pre-engineered framing kits can be custom-sized to project specs, ensuring both strength and compliance.
1.3. Moisture, Ventilation & Utility Management
- For bathrooms: Install vapor barriers, use moisture-rated drywall (cement/green board), confirm exhaust fan venting.
- Pre-route any utilities: All pipes and wiring must be safely moved before framing—critical for compliance and to avoid future damage (reference).
1.4. Rough Opening Sizing
- Add 2″ to door width and 4.5″ to height for rough opening, accommodating the pocket frame, track assembly, and leveling shims.
1.5. Code Compliance Checklist
- ADA handle height (typically 34–48″ above finished floor)
- Fire and sound rating (required for many commercial/residential bathrooms)
- ChinaBestBuy offers full spec consultations for code-compliant builds (learn more).
Pro Tip: Document everything—measure twice, consult plans, and photograph the cavity for QA before closing it up.
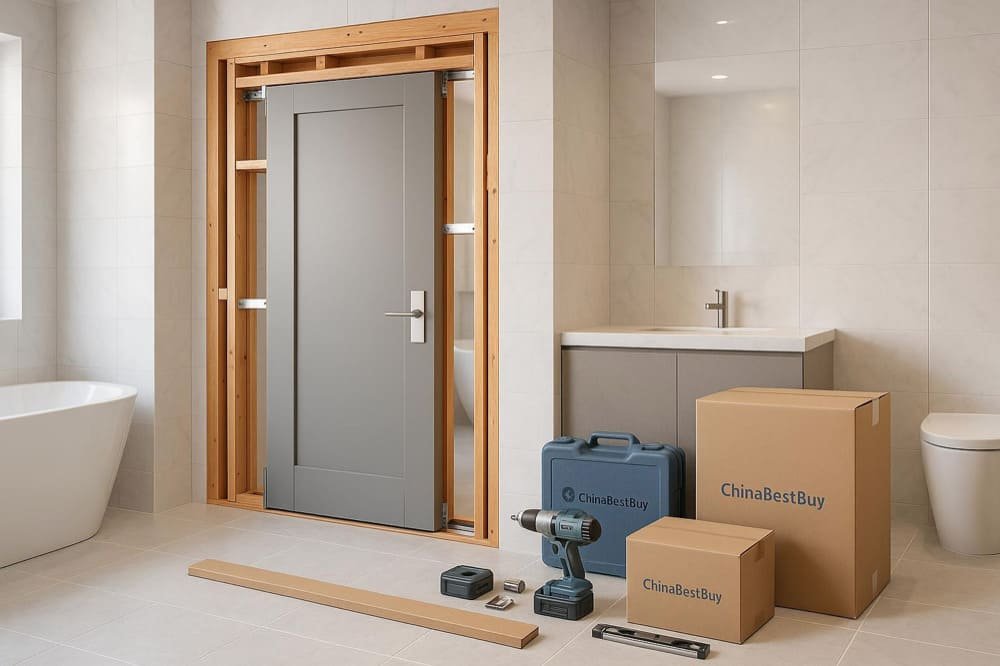
Step 2: Framing and Opening Creation

A strong, square, plumb frame is the backbone of pocket door performance.
2.1. Demolition and Wall Opening
- Strip existing drywall/panel, mark out your new opening using a chalk line.
- Remove any interfering studs, maintaining structure for adjacent walls.
- Install king/jack studs for structural integrity.
2.2. Reinforced Header Installation
- Fit double 2×10 or engineered lumber (ChinaBestBuy kits offer pre-sized headers for standard and custom doors).
- Secure with framing anchors; level and brace until set.
2.3. Split Studs & Blocking
- Install split studs (typically in ChinaBestBuy frame kits) for pocket clearance.
- Block the pocket cavity for smooth drywall mounting and future trim installation.
- Use shims and a laser level for perfect plumb/square.
2.4. Moisture and Soundproofing
- Line pocket cavity with vapor barrier or green board.
- Insert acoustic insulation for sound privacy.
Pitfall Forecaster: Rushed framing often produces out-of-plumb pockets—leading to doors that scrape, bind, or leave gaps. Always dry-fit the frame and door before drywalling.
Step 3: Installing the Pocket Door System (Track, Frame & Hardware)
With the frame prepped, precision enters the forefront:
3.1. Track & Frame Assembly
- Attach the steel or heavy-duty track to the header using supplied hardware (ChinaBestBuy kits supply pre-drilled tracks and instructions).
- Confirm absolute level along both length and width—using a laser level for best accuracy.
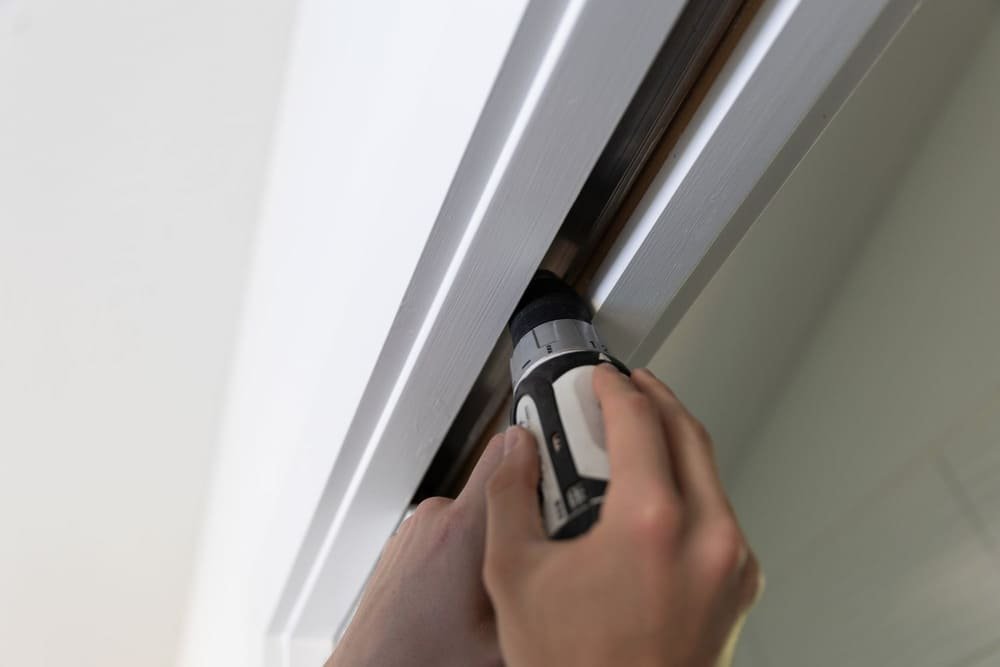
3.2. Door Bracket & Roller Setup
- Attach hangers/rollers to the door slab per manufacturer spec.
- Hang the door: Slide into track, adjust stops, and fit bottom guide so the slab glides with zero lateral movement.
- ChinaBestBuy offers silent/soft-close tracks—encode these for high-end or ADA projects (hardware reference).
3.3. Frame Stabilization and Fine Adjustment
- Shim the frame for zero wobble or flex. Test the fully open and closed positions several times.
- Tighten all mountings—replace any stripped anchor points.
3.4. Modular/Bulk Efficiency
- For multi-unit installs, pre-assemble frames off-site (ChinaBestBuy batch supply available).
- Use off-site pre-assembly (ChinaBestBuy batch supply available).
- Use magnetic drivers, roller jigs, and panel carriers for speed and safety.
Efficiency Optimizer: Always install the pocket frame and track BEFORE drywall goes in—the added visibility saves hours of adjustment and avoids hidden misalignments.
Step 4: Door Hanging, Drywall Finishing & Trim Integration

4.1. Final Door Hanging
- Hang the door slab, checking for glide, fit, and full clearance. If heavy, lift with helpers or a panel carrier.
- Adjust rollers, stops, and bottom guide for silent, level movement.
4.2. Drywall & Finish Out
- Install moisture-rated drywall (green/cement board) tightly to split studs/blocking.
- Tape, mud, sand smooth—ensuring pocket/jamb reveal is crisp and true.
- ChinaBestBuy’s trim packages match their doors and hardware—order together for seamless look and simple logistics.
4.3. Hardware Integration
- Install privacy latches, ADA handles, fire/sound-rated locks as specified. Avoid twisting/knob hardware for ADA compliance; check fit before final mounting.
- Soft-close or magnetic stops are recommended for high-use or luxury projects.
Troubleshooting: If the door scrapes, binds, or leaves gaps, check:
- Track level and mounting points
- Split studs for square/plumb
- Hardware adjustment and stops alignment
Problems here are typically traced to framing slip-ups or rushed finish work.
Step 5: Final Inspection & Adjustment Checklist
Before handover or closing up the project, use this pro-grade QA routine:
- Door slides fully open and closed with zero resistance or noise
- Door sits perfectly flush with jamb and trim—no exposed track/hardware
- Privacy/hardware operates smoothly and locks securely (test ADA/fire points if required)
- No movement at pocket cavity or trim; drywall edges crisp, tape/paint seamless
- Moisture protection intact, no exposed cut edges or penetrations
- Owner education: Review usage/maintenance and warranty info
ChinaBestBuy Quality Assurance: For batch installs, their site QA team can double-check alignments and finish quality, minimizing callback risk and ensuring project specs are met (learn more).
Step 6: Troubleshooting, Maintenance, and Workflow Tips
- Common Issues: Pocket doors binding or track noise are almost always from missed level checks or loose anchors. Confirm all fasteners, lubricate rollers (if permitted), and check reveals for even spacing.
- Finish Protection: Tape off jambs and hardware before painting; use dust barriers during sanding.
- Efficiency for Contractors: Stage materials, batch assemblies, and optimize workflow for multi-door or commercial installs. ChinaBestBuy’s logistics streamline large operations—consult their supply chain team for complex scheduling or custom needs.
- Warranty/QA: Record install steps for future inspection or warranty. ChinaBestBuy supports post-sale troubleshooting and parts replacement as needed.
For technical fixes and solutions to rare or complex problems, reference pocket door troubleshooting guides and always consult authoritative manufacturer protocols.
Conclusion: Why ChinaBestBuy Enables Flawless Pocket Door Projects
Professional pocket door installations combine engineering precision, code compliance, and visual perfection—and the margin for error is small. By sourcing materials, kits, and technical support from ChinaBestBuy, contractors and designers secure not just component reliability, but logistics and QA support ideal for large-scale or custom projects.
- One-stop procurement: Doors, hardware, moisture-proof finishes, ADA/fire solutions—all factory direct
- Custom design & consulting: Sizes, finishes, compliance advice at your fingertips
- Quality assurance & aftercare: Site QA and post-sale support to eliminate callbacks
Ready to level up your pocket door installation project? Consult ChinaBestBuy’s experts or request a quote here.
References: